
A glass of water can look clean and still contain substances you would not want to drink. That simple observation is a useful starting point for understanding one of chemical engineering’s most practical jobs: separating unwanted material from water.
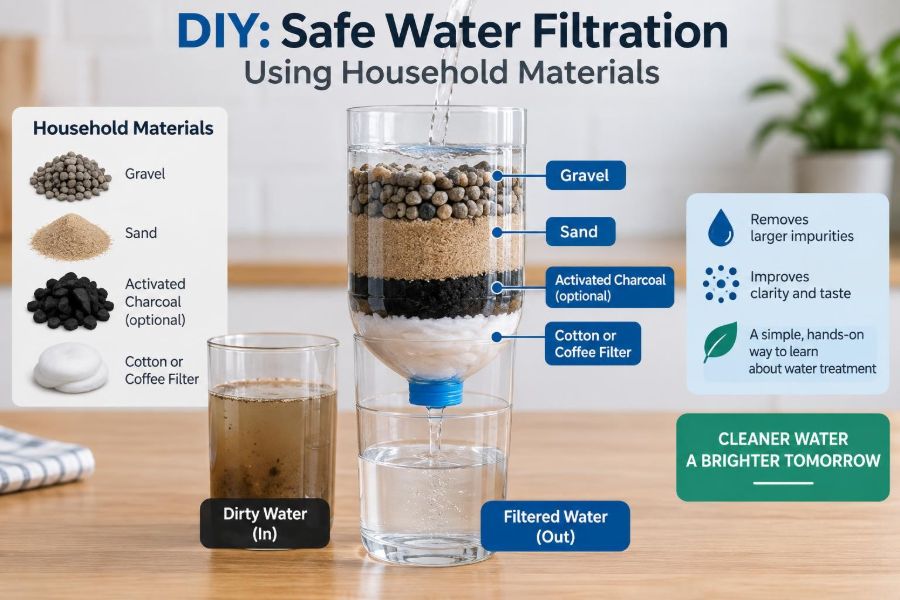
A household filtration demonstration makes the process visible. Muddy water gradually clears as it passes through layers of gravel, sand, and cloth, turning an abstract idea such as “porous media” into something students can observe directly.
It is also easy to draw the wrong conclusion. Clearer water is not automatically safe water. A well-designed demonstration therefore teaches two lessons at once: how physical filtration works, and why real water treatment needs multiple protective barriers.
This project uses common materials, modest quantities, and deliberately prepared “dirty” water. Its value is not producing drinking water; it is learning how engineers select, arrange, test, and improve separation processes.
🧭 Start With the Right Goal
The goal is to build a visual filtration demonstration that removes visible suspended particles from prepared water. Suspended particles are solids dispersed in water, such as soil, paper fibers, or fine sediment.
Do not describe the outlet as potable, purified, disinfected, or safe to drink. The experiment demonstrates reduction of turbidity—the cloudiness caused by particles—not complete treatment of contaminants.
Keeping the objective narrow makes the project safer and scientifically stronger. You can measure a visible change, explain the mechanisms behind it, and discuss what remains unresolved.
⚠️ Treat Every Sample as Non-Drinking Water
Even if the feed water began as tap water, the moment it is mixed with soil or passed through an improvised filter, it should be treated as non-drinking water. Household containers and filter media are not sterile, and microorganisms may be present.
Use only a prepared sample made from tap water plus harmless visible materials. Never test water from ponds, drains, floodwater, aquariums, toilets, unknown pipes, or outdoor runoff.
- Do not drink the influent or filtered water.
- Keep the setup away from food preparation areas.
- Wash hands after handling soil, wet media, and containers.
- Have an adult supervise younger students, especially during bottle cutting.
🔬 See the Project as a Separation Process
Filtration is a separation operation: a fluid moves through a porous material while some solids are retained. In this project, water is the fluid and the layered bed is the porous medium.
The filter does not operate like a single sieve with one exact hole size. Instead, particles can be stopped at the surface, trapped within winding channels, attached to grain surfaces, or settle in quiet spaces between particles.
This is why a layered column is more instructive than simply pouring water through one piece of fabric. Each layer has a different role in controlling flow and capturing material.
🌫️ Distinguish Turbidity From Contamination
Turbidity is an optical property: particles scatter light and make water look cloudy. A filter may noticeably lower turbidity by removing soil and other visible solids.
Contamination is broader. It can include dissolved salts, metals, pesticides, detergents, microorganisms, and very small particles. Many of these are invisible and can pass through a homemade filter.
A useful analogy is a dusty window. Wiping it improves what you can see through it, but it does not tell you what chemicals are dissolved in the glass-cleaning spray. Appearance alone is not a complete water-quality test.
🧺 Gather Simple, Low-Risk Materials
Choose materials that are clean enough for a classroom activity and easy to inspect. The exact items can vary, but the basic design needs a container, a retaining barrier, and media ranging from coarse to fine.
- A clear plastic bottle or large transparent cup with a small outlet opening
- Coffee filter paper, clean cotton cloth, or a tightly woven piece of fabric
- Clean gravel or small pebbles
- Clean coarse sand and clean fine sand, if available
- A second clear container to collect filtered water
- Tap water, soil, and optionally a small amount of torn plain paper for the test mixture
- Spoon, measuring cup, labels, notebook, and scissors or a craft knife for adult use
A clear container is especially useful because it lets you observe water level, air bubbles, channels, and the boundaries between layers.
🧤 Prepare a Safe Work Area
Cover the work surface with a washable tray, baking sheet, or old towel. Filtering takes time, and spills are more likely when a column first becomes saturated.
Wear eye protection if you are cutting plastic or working with dry dusty sand. Gloves are optional for the demonstration itself, but they can make cleanup easier.
Place the collection container on a stable, level surface before adding water. A tall bottle filter can tip if it is supported only by its narrow neck.
✂️ Make a Simple Filter Column
An inverted plastic bottle provides a convenient gravity-fed column. An adult can cut off the bottom, remove the cap, and turn the bottle upside down so its neck points into the receiving container.
Place the cloth or coffee filter inside the neck before adding granular media. It acts as a final support layer, preventing sand from washing out through the outlet.
Do not make the outlet extremely small. A pinched outlet may slow flow, but it can also create unpredictable backups and makes comparisons between trials less meaningful.
🧱 Build Layers From Fine to Coarse
In an inverted bottle, arrange the finest material nearest the outlet and the coarsest material at the top. Water therefore encounters gravel first and fine sand later as it moves downward.
A practical arrangement is cloth at the neck, then fine sand, coarse sand, and gravel. Add each layer gently to reduce mixing, and leave empty space at the top so poured water does not overflow.
The sequence is not merely decorative. Coarse material distributes incoming water and catches larger debris, while finer material provides more opportunities to retain smaller visible particles.
📏 Why Particle Size Changes Performance
Fine sand has smaller gaps between grains than gravel. Those narrower pores can capture smaller particles, but they also resist water flow more strongly.
Gravel has large spaces and allows water to move relatively easily. It is better suited to retaining larger pieces and supporting the layers below it than to producing a very clear effluent on its own.
| Layer | Main role | Typical trade-off |
|---|---|---|
| Gravel | Spreads flow and catches large debris | Limited removal of fine cloudiness |
| Coarse sand | Transitions between large and small pores | Can allow very fine sediment through |
| Fine sand | Retains smaller visible particles | Slower flow and greater clogging risk |
| Cloth or paper | Supports media and catches escaping grains | Can block quickly if overloaded |
🌀 Understand the Role of Pore Spaces
Water does not move through a packed bed in straight lines. It follows connected pore spaces between grains, taking a winding path called a tortuous path.
As water turns around grains, particles have more chances to collide with surfaces or become lodged in narrow gaps. A deeper bed generally creates more of these opportunities than a very shallow layer.
However, pore spaces are not identical. Water may find faster pathways through locally loose regions, which is one reason careful packing matters.
🧼 Rinse the Media Before Assembly
Commercial sand and gravel often contain dust created during packaging and transport. If placed directly into the column, that dust can make the first collected water look worse than the feed water.
Rinse each medium in a separate container with tap water until the rinse water is much less cloudy. Pour the rinse water down an appropriate drain, not into the demonstration sample.
Rinsing does not sterilize the material or make it suitable for drinking-water treatment. It simply removes loose fines that would interfere with the visual experiment.
💧 Wet the Filter Bed Before Testing
Slowly pour clean tap water through the assembled column before using the prepared sample. This wets the cloth and sand, settles the layers, and pushes much of the trapped air out of the bed.
Air pockets can divert flow and cause water to bypass part of the sand. Pre-wetting also lets you see whether the fine material escapes through the outlet or whether a layer has shifted.
Discard this initial rinse water. Once the outflow is mostly clear of loose media, the column is ready for a controlled run.
🪣 Create a Consistent Demonstration Sample
For a safe and repeatable feed, stir a small measured amount of ordinary garden soil into tap water. A few tiny pieces of plain paper can represent larger floating debris, but avoid food, oils, chemicals, or anything that will rot.
Mix the sample immediately before each trial because larger particles settle quickly. If one group pours a well-stirred sample and another pours after several minutes of settling, their results will not be directly comparable.
Label this container “non-drinking demonstration water.” The label reinforces safe habits for everyone nearby.
⏳ Pour Slowly and Observe the First Run
Pour the sample gently onto the top gravel layer. A forceful stream can dig a channel into the bed, disturb the sand layers, and carry particles straight downward.
Watch the water level above the media and the appearance of the outlet. The first portion of outflow may contain residual fine sand, so collect it separately or allow the system to stabilize before comparing samples.
Record the time when pouring begins and when the first filtered water appears. This turns a casual activity into an experiment with observable process behavior.
🧪 Compare Influent and Effluent Carefully
Engineers call the incoming stream the influent or feed, and the exiting stream the effluent. Place equal volumes in matching clear cups against a white background.
Compare cloudiness, visible particles, color, and settling behavior. Photographing the cups under the same lighting can help document the difference, although a photo is still only a qualitative observation.
Do not claim a contaminant was removed simply because the effluent looks clearer. State exactly what you observed: for example, “fewer visible suspended soil particles were apparent.”
👁️ Use Simple Ways to Assess Clarity
A home demonstration does not need a laboratory turbidity meter to generate useful observations. It does need a consistent comparison method.
- Place a printed black line behind each sample and note how clearly it can be seen.
- Shine the same flashlight through equal-depth samples in identical containers.
- Allow samples to stand and compare the amount of sediment that settles.
- Use a simple ranking such as very cloudy, cloudy, slightly cloudy, and visually clear.
These methods are qualitative, meaning they describe rather than precisely quantify a property. That limitation should be written into the results.
📊 Track Flow Rate as Well as Appearance
Clarity is only one outcome. Measure a known collected volume and record the time required to obtain it. Dividing volume by time gives an approximate flow rate.
If the filter produces clearer water but takes an impractically long time, that reveals an engineering trade-off. Real treatment systems must balance water quality, throughput, energy, operating cost, and maintenance.
For fair comparison, keep the starting water volume, layer depth, sample recipe, and pouring method as consistent as possible.
🧩 Learn From a Control Setup
A control is a comparison condition that helps identify what caused an observed result. For this activity, allow a portion of the same prepared sample to sit in a clear cup without filtering.
Some heavy particles will settle naturally. Comparing this cup with the filtered sample helps distinguish sedimentation from removal caused by passage through the media.
You could also build a gravel-only column. If it runs faster but leaves more cloudiness than the layered filter, the contrast illustrates why fine media matter.
🔁 Change One Variable at a Time
Experimentation becomes confusing when everything changes at once. If you use more fine sand, a different cloth, a new water recipe, and a new pouring speed in one trial, you cannot tell which change mattered.
Choose one variable, such as fine-sand depth, and keep the other conditions unchanged. Run repeated trials when practical because one run may be affected by uneven packing or accidental channeling.
This approach reflects a core engineering habit: use controlled comparisons to convert observations into defensible conclusions.
🛤️ Watch for Channeling and Bypass Flow
Channeling occurs when water finds a preferred fast route through a filter bed rather than moving broadly through the media. It can happen if layers are uneven, dry pockets remain, or water is poured too forcefully in one place.
Channeling reduces contact between water and the granular media. A filter may appear to work because some water is treated, while another fraction bypasses much of the effective bed.
Prevent it by leveling layers, pre-wetting the bed, pouring slowly, and avoiding large gaps along the container wall.
🚧 Recognize Clogging as a Process Limit
As particles collect in the fine sand and cloth, flow becomes slower. This is called clogging or fouling. In a demonstration, it may be obvious when water pools above the top layer for a long time.
Clogging is not always evidence that the filter is “better.” It means the retained solids are restricting pore spaces, and eventually the system needs cleaning, replacement, or a pretreatment step.
Municipal systems often remove larger solids before fine filtration for this reason. Protecting a fine filter can extend its usable operating time.
🧱 Connect the Model to Full-Scale Treatment
A homemade column resembles only one part of water treatment: granular filtration. Full-scale systems may use screening, settling, chemical coagulation, filtration, disinfection, and monitoring in sequence.
Coagulation is the addition of carefully selected chemicals that help tiny particles cluster into larger groups. Those groups can settle or filter more readily than individual fine particles.
Disinfection is a separate barrier aimed at reducing harmful microorganisms. It may involve methods such as chlorination, ultraviolet light, or ozone under controlled conditions. Do not attempt to recreate these processes casually at home.
🦠 Know What This Filter Cannot Demonstrate
This setup cannot verify removal or inactivation of bacteria, viruses, protozoa, dissolved chemicals, salts, or heavy metals. It also cannot establish whether the filtered water meets any drinking-water requirement.
Activated carbon, often discussed in household filters, can adsorb some compounds under specific conditions. Adsorption means molecules accumulate on a surface. But carbon is not a universal solution, becomes exhausted, and does not remove every dissolved substance.
The central limitation is simple: visible improvement is not a safety test. Safe water decisions require appropriate treatment design and testing.
🧠 Avoid Common Interpretation Errors
The most common mistake is treating clear water as proof of purity. Another is comparing samples in different-sized or differently colored containers, which can make one appear clearer for purely visual reasons.
Be cautious with claims such as “the filter removed germs” or “the gravel cleaned the water.” Unless a property was measured with an appropriate method, describe results as observations rather than certainty.
- Do not use odor as a safety indicator.
- Do not reuse wet media for long periods; it can develop biological growth.
- Do not add bleach, vinegar, soap, or other chemicals to create a dramatic effect.
- Do not pour collected samples back into a household drinking-water container.
🧹 Dispose of Materials and Clean Up Responsibly
Let solids settle if needed, then dispose of small quantities of soil-containing water according to local household guidance, typically through an appropriate drain with plenty of water. Avoid putting sand or gravel into sinks because it can accumulate in plumbing.
Place used paper filters, cloth, and spent media in the trash unless they can be safely cleaned for another non-drinking demonstration. Wash containers, trays, and tools with soap and water after use.
Remove labels only after cleanup is complete. A labeled container is less likely to be mistaken for a drink during the activity.
📝 Turn Observations Into an Engineering Report
A strong project record explains what was done and what the evidence supports. Include a diagram of the filter, the order and approximate depth of media, the sample recipe, and the observation method.
Separate results from interpretation. “The line behind the effluent was easier to see” is a result; “fine sand likely retained more suspended soil than gravel alone” is an interpretation.
Finish with limitations. Mention that the trial assessed visible particle removal only, that conditions were simplified, and that no drinking-water safety conclusion can be made.
🎓 Adapt the Demonstration for Different Learners
Younger learners can focus on vocabulary: mixture, particle, filter, clear, and cloudy. Ask them to predict which layer will catch the largest pieces and why water slows in sand.
More advanced students can calculate approximate flow rate, make replicate columns, compare media depths, or discuss pressure drop—the loss of pressure as water moves through resistance in the bed.
Working professionals can use the activity as a quick visual bridge to process concepts such as pretreatment, residence time, bed loading, fouling, controls, and performance verification.
🏭 Relate the Demo to Chemical Engineering Thinking
Chemical engineering is often associated with large plants and complex equipment, but the underlying questions are present in this bottle: What enters the system? What mechanism produces separation? How fast does it operate? What fails over time? How do we know it performed as intended?
The project also shows why process design is iterative. A faster gravel bed may have insufficient particle removal, while a fine bed may clog too rapidly. The preferred design depends on the stated objective and constraints.
That systems perspective is more valuable than memorizing the names of the layers.
🌍 Connect Water Treatment to Public Health and Infrastructure
Reliable water service depends on treatment plants, distribution networks, trained operators, monitoring, maintenance, and source-water protection. Filtration is valuable, but it works as part of a larger system rather than as an isolated trick.
The demonstration can encourage thoughtful questions about where local water comes from, why pipes and treatment equipment require upkeep, and why emergencies may require official guidance rather than improvised devices.
Understanding these boundaries builds respect for infrastructure without making the subject feel distant. A small column on a table can reveal the logic behind much larger engineered systems.
✅ The Core Takeaway: Separation Needs Evidence
A layered household filter can make cloudy demonstration water look substantially clearer by retaining visible suspended solids. It is a useful model of granular filtration, flow resistance, clogging, and the trade-offs that engineers manage.
Its most valuable lesson is not “build a filter and drink the result.” It is that treatment claims must match the evidence collected. Visual clarity supports a claim about visible particles, not a claim about microbial or chemical safety.
When you define the goal, control the test conditions, observe carefully, and state limitations plainly, a simple DIY activity becomes a rigorous introduction to separation engineering.
A safe water-filtration demonstration teaches that clearer water is an observation, while safe water requires validated treatment and evidence. 🧪💧🔍